Tips on Getting Good Clinical Photographs
Most doctors practicing aesthetic medicine and surgery understand the value of good clinical photographs. They are invaluable for documenting your work, showing patients the results of treatments, and for helping potential patients to understand the benefits of a service.
Use the right camera
To get great clinical photographs, it is helpful to have a few basic tools. The most essential item is a good digital camera. The important thing is the focal length of the lens. When the lens is too short, it can distort the face. Your cell phone camera has an effective focal length of 28 mm, which is quite wide and will distort the face. A much better length is an effective focal length of approximately 100 mm. This is the focal length of the classic portrait lens. It minimizes facial distortion. If you use one of the popular Canon DLSR cameras like the 60D or the 70D, the APC sized sensor is smaller than a full frame sensor, which is based on the size of a 35 mm film frame that measures 36 mm by 24 mm. In the smaller APC size, the ideal portrait lens focal length would be about 60 mm. For example, APC sized sensor found in the Canon 60D and 70D cameras measures 22mm by 15 mm. The so-called crop factor for the APC sized sensor compared to a full frame sensor is 1.6. When the crop factor of 1.6 is multiplied by the 60 mm focal length, one gets an equivalent focal length of 96 mm. Use the right focal length to avoid axial distortion. Your local camera store can help you get an appropriate digital camera with the right focal length for less than $1,000. Don’t get more camera than you need.
Use the right lighting
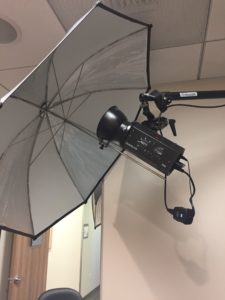
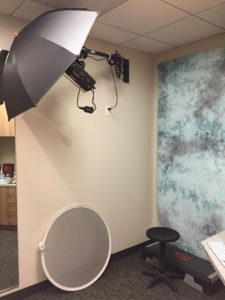 The flash built into your camera will not evenly illuminate your patient’s face. I recommend using a single external monolight Strobe (see figure). I have this mounted to a wall for convenience. That is a powerful strobe light that is triggered by a remote sensor mounted on the hot shoe for the camera. The light is mounted above the patient and directed into a reflective umbrella (see figure). This ensures a uniform, even light over the face. I have the patient hold a circular reflector in their hands when the picture is taken. This bounces light from the strobe back up under the chin to reduce shadowing in the neck. Your local camera store can help you find the equipment you need for a professional lighting set up. There are more camera mounted lighting solutions but these are cumbersome and having a dedicated lighting set up is very practical. I dedicate a room for photography which is also where I keep a computer to help patients compare their before and after images and explain their results.
Use the right image size
 Current digital single lens reflex (DSLR) cameras take pictures with very high resolution. Unless you plan on making a billboard sized print from a digital file, it is probably unnecessary to have a file for each photograph that is 24 megapixels. A file that is 6 megapixels is more than sufficient for clinical use including use on the Internet, lectures, and making prints that are smaller than 8 X 10 inches. Depending on the camera, you can select a medium file size and that should be about right. This reduces the amount of file storage you will need to devote to storing your clinical images on your computer.
Take the right picture
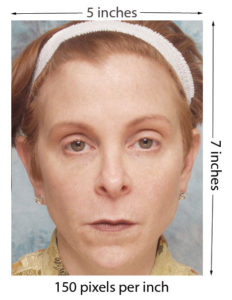 Your full face picture should include the face in repose, no smile, lips together. Ideally the face should be lined up in the Frankfort plane. This is when the face is oriented so that the inferior margin of the orbital rim lines up to the upper margin of the ear canal on a horizontal plane. This is considered the neutral position of the face so that the chin is neither up nor down. The image of the face should just include the top of the head to just below the chin showing a bit of the neck. The photograph should include both ears. I have my patients were a hair band to keep the hair off the face. To prepare these images for transmission to the Microdropletlift.com, the image size can be reduced in a photo manipulation program .